Domain
This application is here to manage all administrative settings of your domain.
This application is only accessible to the administrator and super-administrator of the domain.

From this application, you can manage the following settings:
Users
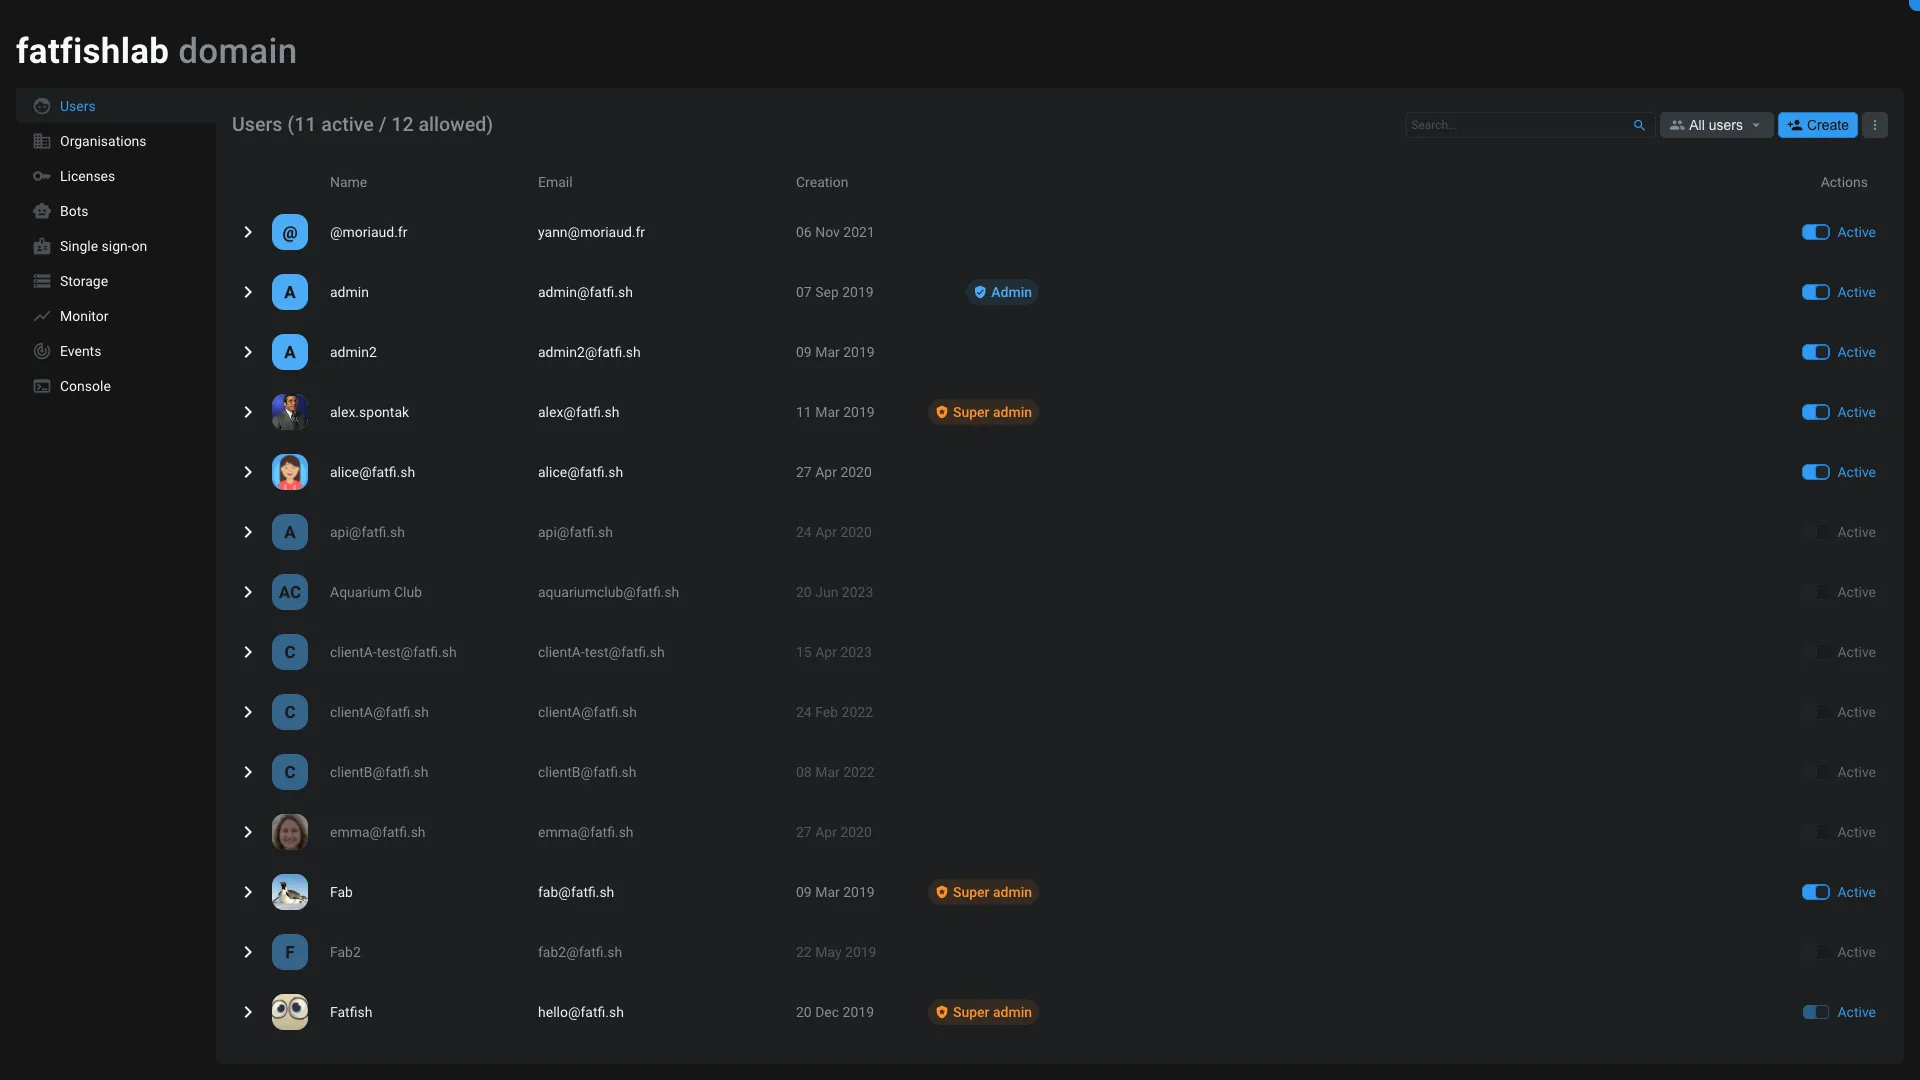
This section allows you to manage the users of your domain.
Users can be activate / deactivate from here. Deactivated users are not able to log in on the platform, but can still be accessible in the project to assign them tasks for example.
When you disable a user, all its sessions ends immediately.
To create a user, or multiple users at the same time, you can use the Create button on top of the interface.
The only mandatory information to create a user is the email address.
When you create a user, and you don't set a password, the user will receive an invitation email. The invitation email is only valid for a certain number of days, after which the user will have to request a new link using the Forgot password link on the login page. Lean more on this process in our dedicated guide.
If you unfold a user, you can edit its information using the Profile application.
You can also make its account as admin or super-admin.
Admin and super-admin
Aquarium works on the principle of domain system, like an Active Directory for example.
Being an admin or super-admin makes you member of Domain admins usergroup. By default this usergroup is present on all items. So admin and super-admin can access all projects for example.
The difference between an admin vs a super-admin, is that super-admin can edit domain settings like licenses, and manage users.
Here is a table explaining the differences between admin and super-admin:
| Feature | Admin | Super-admin |
|---|---|---|
| Have access to the domain application | Yes | Yes |
Member of Domain admins usergroup |
Yes | Yes |
| Promote to admin or super-admin | No | Yes |
| Create users | No | Yes |
| Edit users | Yes | Yes |
| Create usergroup | No | Yes |
| Access all items (like projects for example) | Yes | Yes |
| Manage licenses | No | Yes |
| Manage storage | No | Yes |
| Manage bots | No | Yes |
| Use the console | No | Yes |
| Can requeue events | No | Yes |
| Manage SSO | No | Yes |
| Manage SCIM | No | Yes |
If you don't want an admin or super-admin to access specific project, you can remove the Domain admins usergroup from the participant.
Special permissions for events & SCIM
To avoid giving admin or super-admin permissions to users or bots that require only being able to use Events or SCIM API, we introduced two specific permissions toggle:
Events: Allow the user to interact with the events API and requeue events.SCIM: Allow the user to interact with the SCIM API.
The SCIM permission is not used to "setup" SCIM credentials. This permission only allows the user to authorize SCIM API requests.
Organisations
This section allows you to manage the organisations of your domain. You can create as many organisations as you want. You can use an organisation to regroup users and projects together.
Be default, users can't see each others, unless they are in the same organisation.
If you need users from different organisations to collaborate, you can edit the organisation permissions to allow Read only on the other one (and vice versa).
Each organisation have their own settings that you can edit using the Organisation application.
Licenses
This section allows you to manage the licenses of your domain. You can see the number of licenses you have, and the number of licenses you are using. You can also edit you license to request more active users and storage.
Here is a short video from our guide, explaining how to manage your licenses:
If you think that your license is not updated after you requested more/less active users or storage, you click on the refresh button next to the Upload license button.
If you need more than one license to have separate billing, contact our sales team.
Bots
This section allows you to manage the bots of your domain. You can create as many bots as you want. Bots works like users, you can invite a bot to a project, usergroups, organisations. Except that a Bot can't log in on the platform, just use the API.
You can use bots to authenticate your scripts to the API.
A bot can be promoted to admin or super-admin, and you can activate/deactivate it.
SSO
SSO is the abbreviation of Single Sign-On. It's here to allow you users to use external credentials to log in on Aquarium. Like using their professional credentials instead of having to remember a new password.
Our SSO integration is only compatible with OpenID Connect (OIDC) standard. You need to use a provider that is compatible with OIDC, like Google Workspace, Okta, Microsoft Entra, ...
Here is Aquarium's requirements :
- Authentication with client secret
- Authorization Code
- Minimum scopes: openid, email
- PKCE as additional verification
Today, only Okta is compatible with user groups synchronisation. If you use another provider, feel free to contact us to see if we can help you.
To configure SSO, you need to fill the following fields:
| Field | Description | Required |
|---|---|---|
| Issuer endpoint | The URL to the identity provider | Yes |
| Authorization endpoint | The URL to redirect the user to authenticate | No |
| Token endpoint | The URL to get the token | No |
| JWTs endpoint | The URL to get the JWT Set | No |
| Client ID | The ID of your application | Yes |
| Client secret | The secret of your application | Yes |
| Allow sign-up with SSO | Automatically create an Aquarium account if its doesn't exist yet | No |
| Create non-existing users | Create users that don't exist yet | No |
| Synchronize user groups | Synchronize user groups from your provider | No |
How to configure with Google Workspace ?
- Here is a Google documentation explaining how to enable OIDC for your domain.
- Once you followed their explanation for
Setting up OAuth 2.0, you can filled the following fields in Aquarium:- Issuer endpoint:
https://accounts.google.com - Client ID: The client ID you got from Google
- Client secret: The client secret you got from Google
- Issuer endpoint:
- Press save and you are done!
How to configure with Okta ?
Here is a short video showing how to configure Okta with Aquarium:
- Here is a Okta documentation explaining how to setup OIDC app integrations for your domain.
- Once you followed their explanation, you can filled the following fields in Aquarium:
- Issuer endpoint:
https://your-domain.okta.com/ - Client ID: The client ID you got from Okta
- Client secret: The client secret you got from Okta
- Issuer endpoint:
- Press save and you are done!
SCIM
SCIM is the abbreviation of System for Cross-domain Identity Management. It's here to allow you to synchronize your users and usergroups from your identity provider to Aquarium.
It's perfect if you want to automate user onboarding and offboarding and increase security by allowing your IT to use a centralised platform to manage users and group assigment.
You can use SCIM with any provider that is compatible with SCIM, like :
Authentication
Our SCIM implementation uses OAuth Bearer Token for authentication. This ensures secure and authenticated communication between your identity provider and Aquarium, allowing for seamless synchronization of users and user groups.
How to configure SCIM ?
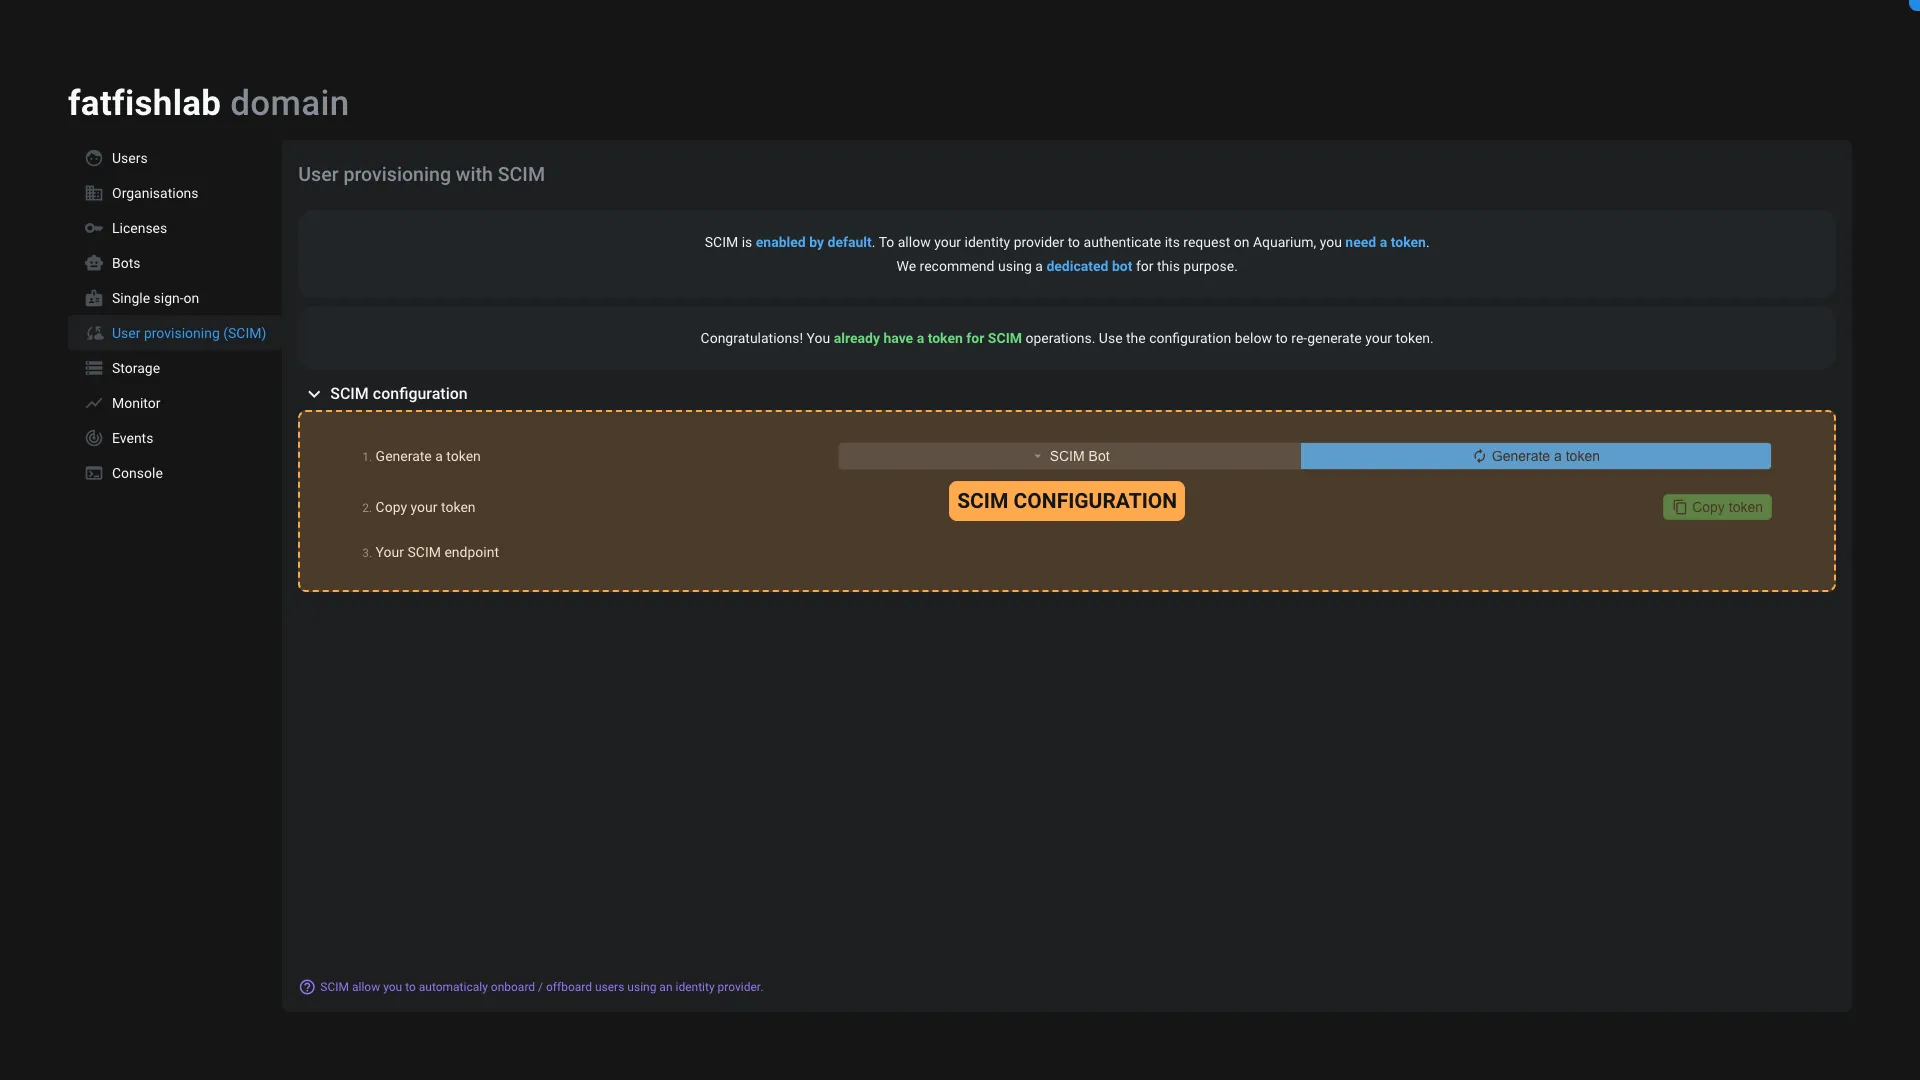
You will need to obtain a Bearer Token from Aquarium to authenticate your identity provider. The best is to use a dedicated Bot with Super-admin or SCIM permissions. All that process is automated from the SCIM tab in the domain application.

- Create a new Bot or select an existing bot from the dropdown.
- Press the
Generate tokenbutton. - Copy the token and paste it in your identity provider.
- Copy the SCIM endpoint and paste it in your identity provider.
Aquarium uses the email of a user to uniquely identify them in the SCIM API. So if your identity provider lets you choose the userName used in the SCIM API, you should use the email or its equivalent.
If you don't use the email as SCIM userName, you will have errors when trying to sync an existing user.
How to configure SCIM with Okta ?
Here is a short video showing how to configure Okta with Aquarium:
If you need help to configure SCIM with your identity provider, feel free to contact us.
Storage
This section allows you to manage the storage of your domain. All your upload files and medias will appear here.
You can filter your files and delete them to release storage. You can also click on a file to see the file, its metadata and locate it in your items.
A file can be used on multiple items, to save space and money. That's why the locate section can display multiple items.
Monitor

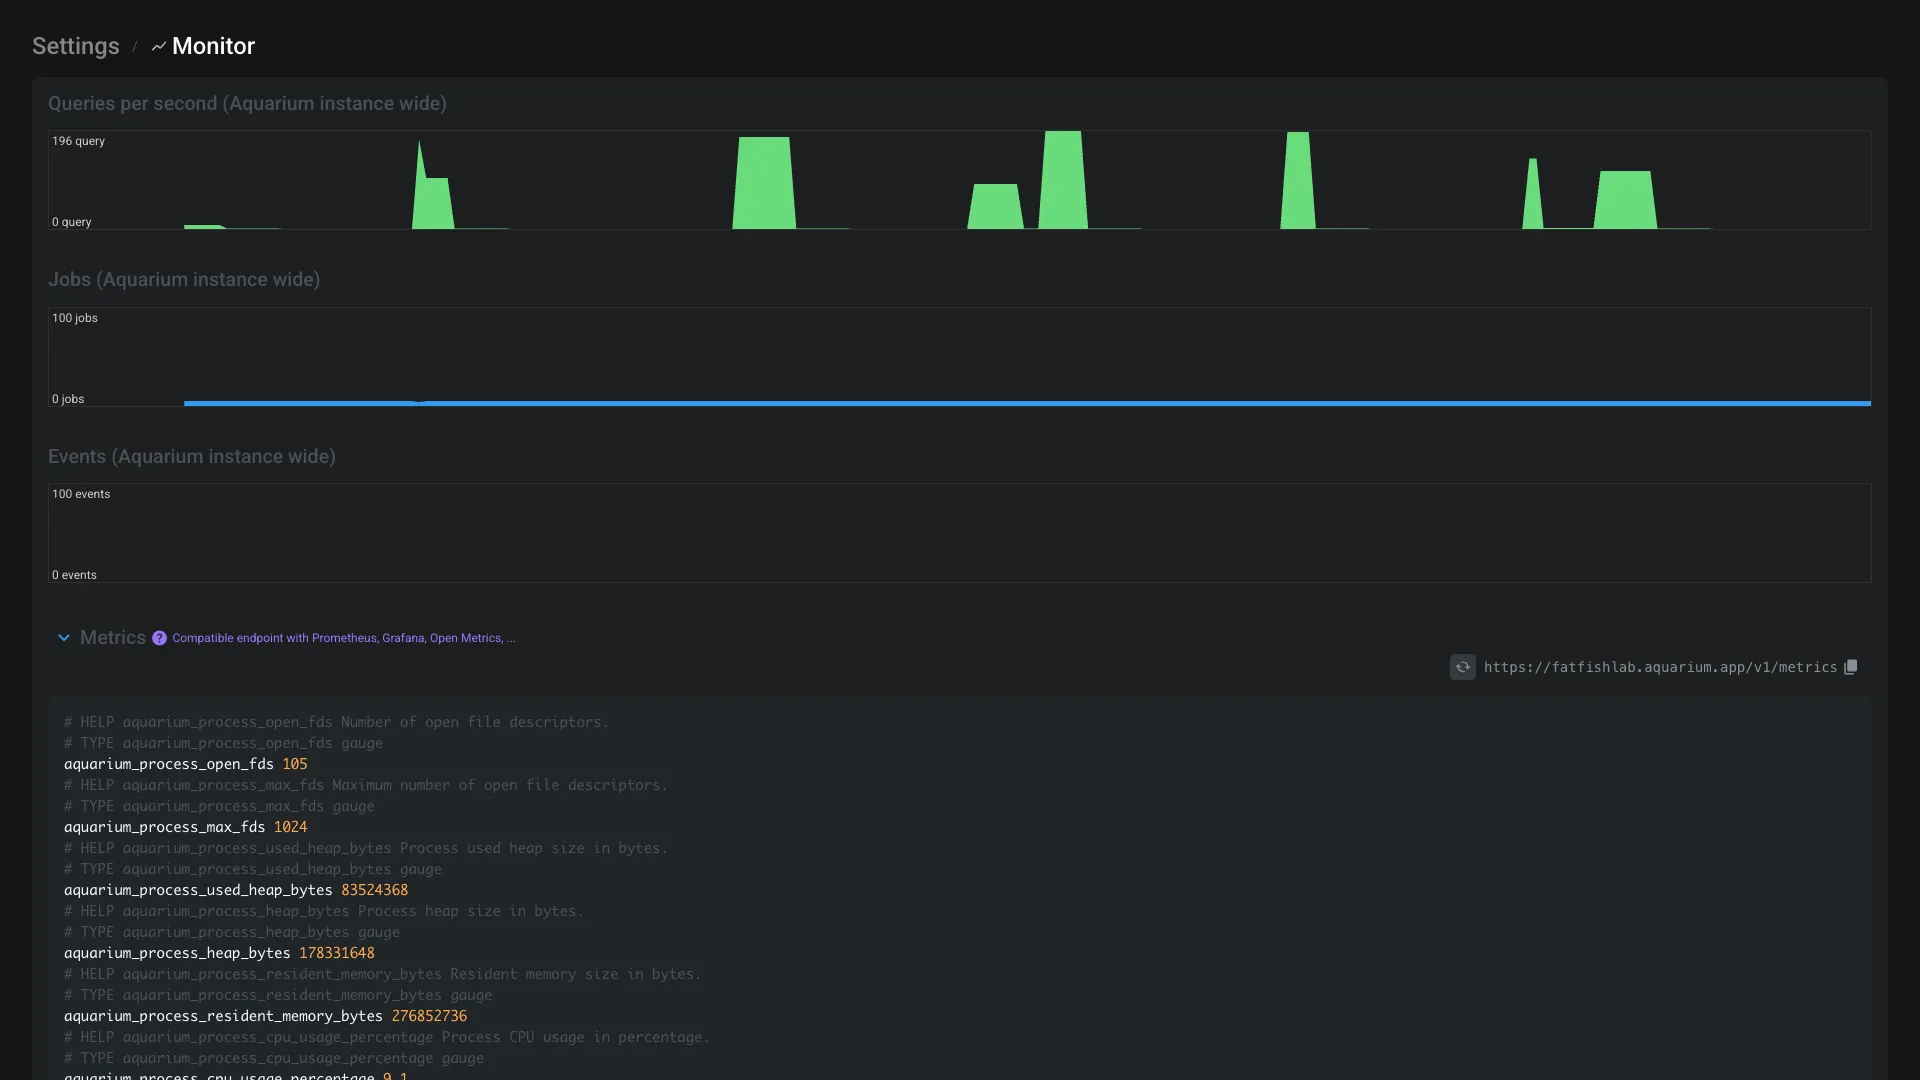
From the monitor section, you can visualize live graphics and access to the /metrics endpoint for more in depth monitoring.
Graphics
This section provide 3 graphics to monitor your Aquarium instance:
Metrics
The metrics are exported in OpenMetrics format, so you can use any OpenMetrics compatible tool to visualize it, like Prometheus or Grafana and many more.

We created a dedicated guide to help you configure Grafana to monitor your Aquarium instance. Follow this guide to see how to configure it.
Events
From this section, you can see all the events that have been processed by Aquarium.
An event has a topic that represent the type of event. The topic is a string composed by : [custom].category.verb.[entity type]. The entity type is here to help you filtering then events.
Example:
item.created.Shot,edge.removed.Child,custom.{your.event}, ...
The conjugation of the verb is helping you to understand if the activity associated with the event already happened (past tense, ex: item.created) or is going to happen (present, ex: file.encode).
Here is a list of the topics that Aquarium generates:
edge.created: Event triggered when an edge is created.edge.removed: Event triggered when an edge is removed.edge.updated: Event triggered when an edge is updated.events.ticked: Event triggered at each tick of the system.file.encode: Event triggered when a file is start encoding.file.vectorscope: Event triggered when file start encoding has vectorscope (used for sound file).item.created: Event triggered when an item is created.item.removed: Event triggered when an item is removed.item.updated: Event triggered when an item is updated.permission.copied: Event triggered when a permission is copied.permission.created: Event triggered when a permission is created.permission.removed: Event triggered when a permission is removed.permission.updated: Event triggered when a permission is updated.user.mentioned: Event triggered when a user is mentioned. This event is triggered each time a user is mentioned.users.mentioned: Event triggered when users are mentioned. This event is triggered only once even if multiple users are mentioned. This event is also triggering even if only one user is mentioned.custom.[...]: You can trigger custom events using the API.
You can click on an event to see its metadata and data. You can also visualize the event in a nodal interface, where you have :
- The event connected to the item that emitted it
- The chain of reaction. Some actions (like when you append an item) can trigger multiple events, so you can see the propagation of the event.
- The Action items that have been triggered by the event.
All the event can be requeue to be processed again.
When you re-queue an event, Aquarium does not trigger the original activity that emit the event. Its only retriggers the Action items that are listening for this event.
Example: If you re-queue an
item.createdevent, Aquarium will not create the item again. But if you have an action that is triggered by theitem.createdevent, this action will be triggered again.
Console
This section allows you to access to the online CLI to trigger some commands. Try to type help to see the available commands.
INFO Aquarium CLI
------------
flags                                        Lists the flags this instance is running with.
version                                      Get the version of Aquarium server.
status                                       Get domain status.
# meshql expression                          Execute a meshql query.
jobs                                         Get the jobs queue length.
events                                       Get the events queue length.
janitor                                      Analyze the database.
janitor -x                                   Cleanup the database.
trash                                        Count trashed elements. Type 'trash -x' to clear.
trash -x                                     Empty trashes.
cache -x                                     Refreshes the cache containing the users and licenses.
--
